On Thursday I went through my editing exam, editing a short film I recently made and on Friday I finished it.
Here are the techniques I used through out editing the film:
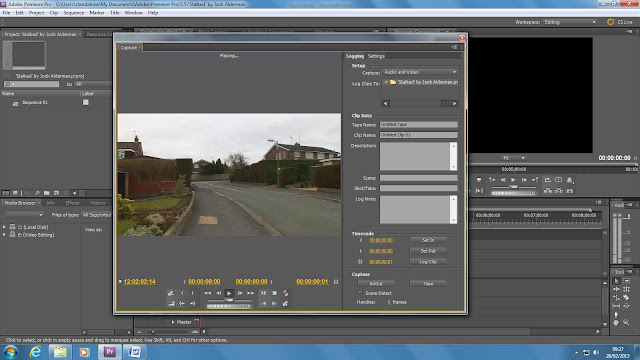
First of all, I captured the footage I needed from the camera onto the computer. I did this by pressing the FILE icon and then onto the CAPTURE icon:
On then came on the screen that will show for when capturing the footage. I then pressed the PLAY icon. While thats playing, I press the RECORD icon which records the footage from the tape, onto the computer:
After I recorded the footage I needed. I had to name the clip I just recorded. After it is named, the file then goes onto the left side in the sequence pile, ready to be dragged to the timeline. This I did through out all the footage I collected:
After this is done, I then dragged the footage onto the timeline, ready to be edited:
For the film, I first of all wanted to make the opening sequence. So I imported the production logo I created on After Effects. I did this by going onto the FILE icon then onto the IMPORT icon. A short cut to this is by pressing CTRL-I. I then chose the file I wanted to import by clicking on it and then pressed the OPEN icon. After that, it then goes onto the sequence pile beside the the timeline on the left side:
I did the same thing with my other production company logos I made on Photoshop. With the icons, I cut some of the footage out because it would last a long time if I left all of it on. I used the CUT tool for this:
I also wanted add in titles to my film. I did this by going on the TITLE icon. Then on to the NEW icon and went onto the DEFAULT STILL icon. This brings out the methods you can use to create the title. I then dragged out a text box to type in the title I wanted. I then pressed CLOSE on the top right hand side and then the title was on my sequence pile. This I also did with the end credits aswell.
While editing I had to keep saving the work I have done. And I also had to render of what I've done. So I went onto the SEQUENCE icon and went onto the RENDER ENTIRE WORK area icon. This will render everything you have captured. A short to do this is simply press ENTER. This I did on many occasions:
I then wanted to add in effects of the editing though out this piece for example, a cross fade. You can find this by going on the bottom left hand corner of the timeline. I went onto the VIDEO TRANSITIONS icon and clicked on the DISSOLVE icon. I then chose the ADDITIVE DISSOLVE icon and dragged it on the clip I wanted:
For this piece. I filmed some foli sounds of footsteps and sounds of me taunting. I captured this footage and put it onto my timeline. I only wanted to keep the sound and not the image. So I pressed the LOCK icon on the left hand side on the timeline. This way, you can delete the area you want. See above.
I wanted to fix the volume on the sounds. So I then went on the EFFECTS on the left side and went onto the AUDIO EFFECTS icon and went onto the VOLUME icon. I then dragged the effect onto the audio I wanted. On the screen that's on the left hand side, this is where you can sort out the volume:
During one point of editing these sounds, I wanted to slow down one of the footstep sound effect so that it matches the footage of when the stalker is walking to the young boy. I did this by right clicking on the audio and chose the SPEED/DURATION icon. This way you can slow down the footage you want. You can choose 100% , 40% etc. I slowed it down to 90%:
After most of the footage was collected, I then wanted to collect the establishing shots to go at the beginning. I collected them successfully but the picture quality needed improving, so I went back to the EFFECTS on the left hand side. I went onto the VIDEO EFFECTS icon and then went onto COLOR CORRECTION. This way you can fix the image of the footage. I then went to the CURVES icon. On this, you can change the image by sorting out the colors of red, blue and green. This really helped to make my footage look better. This was the last thing I edited:
On the cross fade effects, I wanted to shorten the effect for the beginning of the film. So I clicked on the effect on the footage and dragged out back to shorten it. Because if I left it, the effect would last a long time:
Before I fixed the color correction, I wanted to add in the royalty free music I downloaded. This took some time because I downloaded more than one track. I imported the tracks in, put them on the timeline and listened to each track to see which one would fit the film.
I chose parts of two tracks that would fit the film. For the end track, I went onto the AUDIO EFFECTS tool on the left hand side. And then went onto the CROSSFADE icon and chose the effect called CONSTANT GAIN. This effect makes the track quiet at first, the volume increases and then the track plays normally. I chose this effect because the ending of the film, the stalker catches up with the boy and the track itself builds up more and more and then jumps.


No comments:
Post a Comment